Gaining Leverage – Physics Works Against You!
A proper discussion about fishing rod action and design would be lacking without first exploring the physical principles of the lever and leverage. A famous quote by Archimedes was ‘give me a lever and a place to stand I and will move the earth’. For a less extreme perspective, consider the force a Collingwood supporter can impart at the head of a set of bolt-cutters. The same principle will also apply for the curved end of a crowbar (Yes Maggie supporters, I can hear your response: “Leva princsapoles. Wat da eff?? Ah, stuff it, time 2 steal sum sh**!”). And the longer the handle, the more force we can exert for the same amount of effort. Sounds great hey! Unfortunately, when you’re the angler holding onto your favourite game outfit, and you’ve finally connected to the fish of a lifetime, you have actually found yourself on the short end of the stick (literally). Based on the principles of physics, the fish actually holds the leverage advantage!
For those who already own a pre-rigged 24kg or 37kg outfit, I have an exercise for you. Firstly, track down a dead weight – let’s say 13kg if you own a 24kg outfit, and 20kg for a 37kg outfit. The dead weight can be anything you are able to easily connect a fishing line to, e.g. some dumbbells from your home gym; a bucket fitted with a strong handle that is filled with an appropriate volume of water, etc. Now, head out to your shed or backyard with your pre-rigged outfit, a gimbal belt, and your dead weight. Securely (and safely) connect you wind-on leader or double to the dead weight. Initially, instead of using the rod to lift the weight, simply pick up the weight with your bare hands and lift it up towards your chin 2-3 times, in a similar motion as if you were lifting with the rod. Reasonably easy, hey! Now, with your gimbal belt strapped on and both hands firmly on the foregrip, try to lift the same weight with the rod. Bloody difficult, isn’t it?!! This exercise should also give you an idea about what you’ll be up against if you want to utilize your outfit to its maximum potential (as discussed in the previous post).
These differences you felt are the principles of a ‘
third-order lever’ in action, which in contrast to first- and second-order levers, does NOT offer a mechanical advantage. In the context of a fishing rod under load, the
fulcrum is the rod butt (e.g. for gamefishing, where the butt slots into the gimbal belt), the
effort point is where your hands are located on the foregrip or where the harness is clipped onto the reel lugs, and the
load point is at the rod tip. For explanation purposes, let’s start by saying that the rod has no flex whatsoever, like a broomstick. When a fish is peeling line away from you, the load the fish is pulling against will equate to your pre-defined drag setting coming off the rod tip (excluding the effects of water drag on the line). This will be your
output load. The amount of output load will determine how much force you the angler, must apply to the effort point to keep the rod in the same position, or if you apply more force, to allow the rod to be lifted upwards. Unfortunately, because a fishing rod is a third-order lever, this means that the
effort point will generally be positioned closer to the
fulcrum than it is to the
load point, meaning there will be less overall load at the
load point (what the fish is pulling) in comparison to the overall load at the
effort point (what the angler is pulling). That’s why the dead weight you lifted in my previous exercise felt so much heavier when it was lifted with a rod in comparison to your bare hands.

- third order lever.jpg (8.54 KiB) Viewed 2323 times
However, there are ways to greatly reduce the overall load at the effort point (i.e. how much force the angler has to pull against). This is done by moving the
effort point closer to the
load point. The most basic example of this would be to just move your hands further up the foregrip. Alternatively, if you’re going to use a harness, it can also help to move the position of the reel further up the rod (i.e. have a longer butt section) provided the setup remains comfortable and the reel is still within easy reach. The other option for reducing the overall load on the angler, is to move the
load point closer to the
effort point. Put simply, get a shorter rod. That’s why your trusty twelve-foot surf rod might not be the best choice for gamefishing.
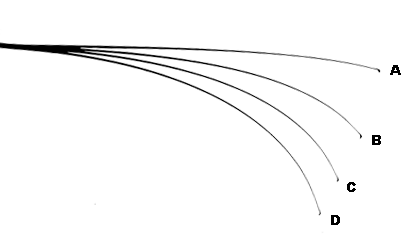
The other advantage we have up our sleeves with fishing rods (in comparison to the broomstick) is that they deflect or flex. In a situation where a third-order lever is able to flex, it essentially means that the position of the
load point changes (i.e. rod tip flexing down towards the water), while the fulcrum and effort point remain in the same positions. The greater the deflection, the shorter the overall ‘
effective length’ of the rod will be (i.e. the straight-line distance between fulcrum and load point). You can see in the picture below that ‘blank D’ has a shorter ‘effective length’ than ‘blank A’. And having a shorter ‘
effective length’ means that the
load point has been brought closer to the
effort point, meaning less load on you, the angler.
[img
- c73mh-deflection.png (56.96 KiB) Viewed 2323 times
][/img]
One of the more striking differences in Kilsong’s vs Winga’s videos (see previous post) was the difference in flex/deflection/action of the rod they were each using. Winga’s T-curve deflected to only the second or third roller down from the rod tip, whereas Kilsong’s rod was able to deflect right down to the reel seat at maximum load. So even though Kilsong’s rod had a greater overall length than Winga’s, the parabolic bend allowed the ‘effective length’ to be shortened significantly, thereby greatly minimizing the effort the angler had to exert.
So, if physics is telling us all this, then why aren’t all standup game rods as short, with longer butts, and heaps of flex? Well, there’s a variety of reasons why this isn’t the case, and I will go through them in my next post.